이 글에서는 이맥스에서 bitbake tree-sitter parser를 사용하기 위해 major mode를 구현하는 방법을 소개한다.
Syntax Tree Generator 출현
Tree-sitter1 는 소스 코드를 syntax tree로 만드는 ‘parser generator tool’이다. Emacs, Neovim, Zed 등의 편집기에 기본으로 builtin 되어 제공된다. 편집기에서 지원하는 건 별개이지만 2018년에 처음 릴리즈 되었다고 하니 벌써 6년이나 된 기능이다. 처음 tree-sitter 출현을 접했을 때 들었던 생각은 ‘대체 왜 만든걸까?’ 였다. 이미 syntax highlighting 기능은 오래 전부터 제공되던 기능이었기에 실시간으로 소스 코드로부터 syntax tree를 만들 수 있다는 게 어떤 장점을 가질지 예상하기 힘들었다.
레거시 방식
Emacs는 버퍼 확장자에 따라 언어 지원을 위한 major mode가 로드된다. 예를 들어, C언어(*.c, *.h)는 c-mode 패키지가 자동으로
로드되며 해당 패키지를 통해 syntax highlighting 기능이 제공된다. C-h v auto-mode-alist 명령어를 통해
auto-mode-alist를 확인하면 아래와 같이 c-mode가 할당된 확장자를 확인할 수 있다.
 ("\\.ii\\'" . c++-mode)
 ("\\.i\\'" . c-mode)
 ("\\.lex\\'" . c-mode)
 ("\\.y\\(acc\\)?\\'" . c-mode)
 ("\\.h\\'" . c-or-c++-mode)
 ("\\.c\\'" . c-mode)
 ("\\.\\(CC?\\|HH?\\)\\'" . c++-mode)
 ("\\.[ch]\\(pp\\|xx\\|\\+\\+\\)\\'" . c++-mode)
 ("\\.\\(cc\\|hh\\)\\'" . c++-mode)
그렇다면 이러한 Major Mode 패키지가 있는데도 불구하고 tree-sitter를 사용하는 이유는 무엇일까? 훨씬 빠르기 때문이다. tree-sitter 이전까지 이맥스 패키지 대부분은 syntax highlighting을 위해 정규식을 사용했다. cc-mode 코드를 살펴보면 아래와 같이 아름다운 정규식으로 짜여져 있는 것을 볼 수 있다.
(defconst c-or-c++-mode--regexp
  (eval-when-compile
    (let ((id "[a-zA-Z_][a-zA-Z0-9_]*") (ws "[ \t]+") (ws-maybe "[ \t]*")
          (headers '("string" "string_view" "iostream" "map" "unordered_map"
                     "set" "unordered_set" "vector" "tuple")))
      (concat "^" ws-maybe "\\(?:"
                    "using"     ws "\\(?:namespace" ws
                                     "\\|" id "::"
                                     "\\|" id ws-maybe "=\\)"
              "\\|" "\\(?:inline" ws "\\)?namespace"
                    "\\(:?" ws "\\(?:" id "::\\)*" id "\\)?" ws-maybe "{"
              "\\|" "class"     ws id
                    "\\(?:" ws "final" "\\)?" ws-maybe "[:{;\n]"
              "\\|" "struct"     ws id "\\(?:" ws "final" ws-maybe "[:{\n]"
                                         "\\|" ws-maybe ":\\)"
              "\\|" "template"  ws-maybe "<.*?>"
              "\\|" "#include"  ws-maybe "<" (regexp-opt headers) ">"
              "\\)")))
  "A regexp applied to C header files to check if they are really C++.")
이렇게 성능이 떨어지는 방식으로 syntax highlighting 기능을 꾸역꾸역 제공하는 대신 tree-sitter를 이용하면 내가 원하는 파일의 syntax를 실시간으로 parser를 통해 얻어올 수 있고 indentation rule 이나 특정 키워드를 통해 각 노드들의 카테고리를 만들어 가져올 수 있다.
Bitbake syntax highlighting 구현
이미 수많은 tree-sitter parser 들이 공개되어 있다. Github의 tree-sitter-grammars2 를 살펴보면 다양한 언어들에 대해 지원하고 있음을 알 수 있다. 그런데 이러한 parser가 있다고 해서 곧바로 이맥스에서 사용할 수 있는 것은 아니다. 현재 열려있는 버퍼에 대해 매핑되는 major mode를 정의하고 해당 mode에서 tree-sitter 파서가 주는 syntax tree를 이용해 노드 별 카테고리를 만들고 syntax highlighting 컬러에 할당해줘야 한다.
Yocto의 bitbake를 파싱하는 parser는 이미 공개되어 있지만 이를 사용할 수 있는 major mode는 구현되어 있지 않은 상태이다. 필요한데 없으면 만들어야지 어쩌겠는가. 이제부터 bitbake-ts-mode3 코드를 구현하는 과정을 소개한다.
tree-sitter-bitbake 다운로드
기본적인 parser 조차 없었다면 절망적이었겠지만 다행이도 tree-sitter-bitbake 패키지가 이미 구현되어 공개되어 있었다. 먼저 아래와 같이 이맥스의 tree-sitter 리스트에 tree-sitter-bitbake를 등록한다.
(setq treesit-language-source-alist
        '((devicetree "https://github.com/joelspadin/tree-sitter-devicetree")
          (bitbake "https://github.com/tree-sitter-grammars/tree-sitter-bitbake")
          (c "https://github.com/tree-sitter/tree-sitter-c")
          (cpp "https://github.com/tree-sitter/tree-sitter-cpp")))
이제 M-x treesit-install-language-grammar 함수를 이용해 bitbake treesit을 설치한다. 이제 기본적인 parser까지 준비가 됐으니 major mode를 만들고 확장자에 연결할 차례다.
bitbake-ts-mode 생성
Major mode를 만들기 위해 처음부터 모드를 전부 작성할 필요 없이 define-derived-mode 함수를 이용해 기본적인 부분들을
상속하는 형태로 만들 수 있다. 여기서는 programming mode를 상속해서 모드를 정의하였다.
(define-derived-mode bitbake-ts-mode prog-mode "bitbake"
(when (treesit-ready-p 'bitbake)
    (treesit-parser-create 'bitbake)
    (treesit-major-mode-setup))
)
mode를 만들었으니 확장자에 맵핑할 차례다.
(add-to-list 'auto-mode-alist '("\\.bb?\\'" . bitbake-ts-mode))
  (add-to-list 'auto-mode-alist '("\\.bbappend?\\'" . bitbake-ts-mode))
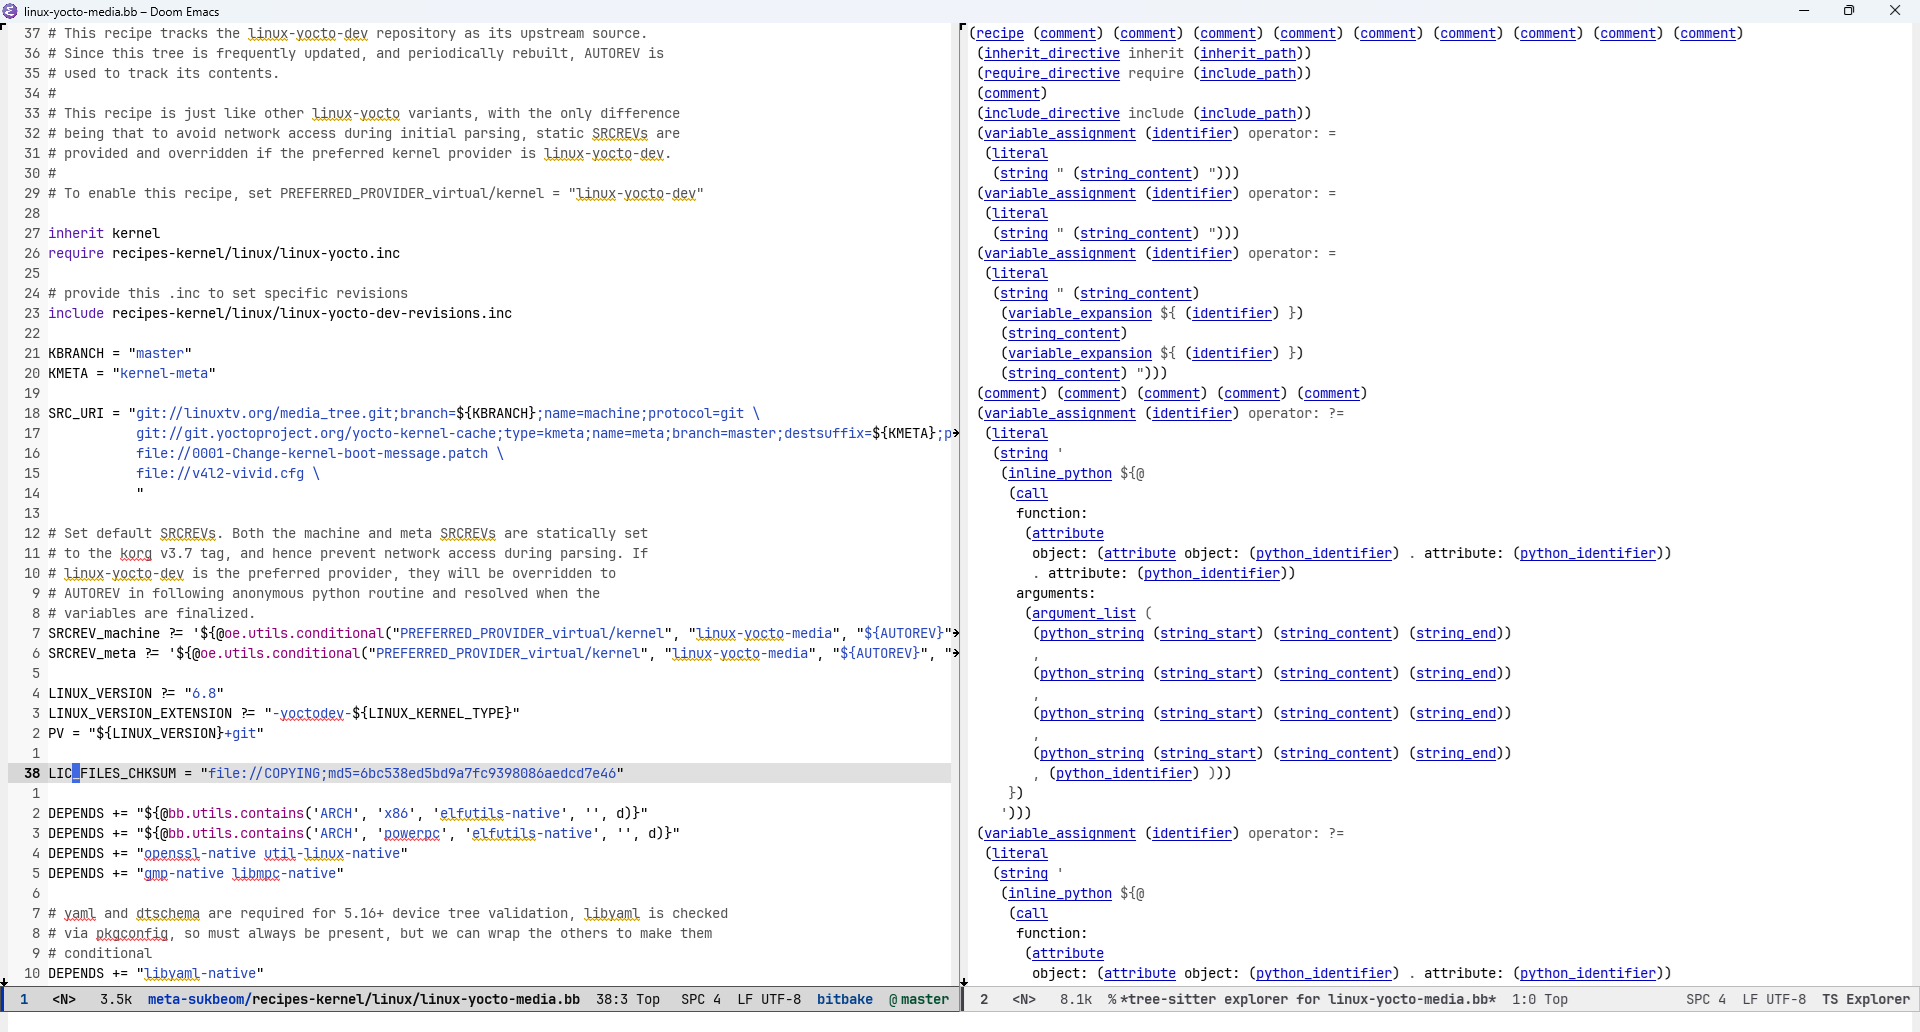
이제 parser가 제대로 동작하는지 테스트할 차례다. bb 파일을 열어본 뒤에 M-x treesit-install-language-grammar 함수를
실행해 커서에 위치한 노드 정보를 정상적으로 파싱해오는지 확인한다. 만약 제대로 설치 및 모드가 연결이 되었다면 아래와
같이 커서 위치의 syntax tree 정보가 보일 것이다.
syntax highlighting
Syntax Tree를 이용해 아래와 같이 font-locking 룰셋을 정의할 것이다. Font-lock4 이란 이맥스 버퍼 내에서 특정
텍스트에 대한 폰트를 지정할 수 있게 해주는 기능이다. 주로 syntax highlighting을 위해 사용한다. Syntax Tree를 얻었으니 이를 이용해 각 노드별로 매칭되는 face를 지정해준다.
(defvar bitbake-ts-font-lock-rules
    `(:language bitbake
      :override t
      :feature attribute
      ((attribute) @font-lock-builtin-face)

      :language bitbake
      :override t
      :feature identifier
      ((identifier) @font-lock-variable-keyword-face)

      :language bitbake
      :override t
      :feature string_content
      ((string_content) @font-lock-string-face)

      :language bitbake
      :override t
      :feature comment
      ((comment) @font-lock-comment-face)

      :language bitbake
      :override t
      :feature keyword
      ([,@bitbake-ts-mode--treesit-keywords] @font-lock-keyword-face)))
여기서 정의된 feature 들은 아래와 같이 treesit-font-lock-feature-list 에 등록해줘야 한다.
  (when (treesit-ready-p 'bitbake)
    (treesit-parser-create 'bitbake)

    ;; Define a list of features of what it is going to be highlighted
    (setq-local treesit-font-lock-feature-list
                '((comment)
                  (keyword)
                  (identifier attribute string_content)))
    ...
feature들을 조합해서 (identifier attribute string_content)로 나타낸 것을 볼 수 있는데 syntax tree가 그러하기 때문이다. 예를 들어, 아래와 같은 라인이 있다고 하면
DEPENDS += "${@bb.utils.contains('ARCH', 'x86', 'elfutils-native', '', d)}"
위 라인은 syntax tree에서 아래와 같이 표현되는데 identifier, attribute, string_content feature 들이 한 라인에
담겨있는 것을 볼 수 있다. 만약 attribute는 syntax highlighting에서 제거하고 싶다면 (identifier string_content) 로
나타내도 무방하다.
(variable_assignment (identifier) operator: +=
  (literal
   (string "
    (inline_python ${@
     (call
      function:
       (attribute
        object: (attribute object: (python_identifier) . attribute: (python_identifier))
        . attribute: (python_identifier))
      arguments:
       (argument_list (
        (python_string (string_start) (string_content) (string_end))
        ,
        (python_string (string_start) (string_content) (string_end))
        ,
        (python_string (string_start) (string_content) (string_end))
        ,
        (python_string (string_start) (string_end))
        , (python_identifier) )))
     })
    ")))
imenu 연동
imenu는 이맥스에서 제공하는 frontend 패키지 중 하나로 원하는 정보를 보여주기 위해 사용한다. 여기서는 yocto recipe의 directive와 identifier 위주로 볼 수 있도록 함수를 구현할 것이다. 사실 이 부분도 syntax highlighting 과 마찬가지로 매우 간단하다.
(setq-local treesit-simple-imenu-settings
              `(("Directive" bitbake-ts-imenu-directive-node-p nil bitbake-ts-imenu-directive-name-function)
                ("Identifier" bitbake-ts-imenu-identifier-node-p nil bitbake-ts-imenu-identifier-name-function)))
directive를 예로 살펴보면, 해당 노드가 directive인지 판단하기 위한 bitbake-ts-imenu-directive-node-p 함수와 노드로부터
어떻게 출력할 것인지 문자열을 반환하는 bitbake-ts-imenu-directive-name-function 을 이용하고 있는 것을 볼 수 있다. 각각의 함수들은 정규식과 treesit-node-text 함수를 이용해 아래와 같이 간단하게 구현할 수 있다.
(defun bitbake-ts-imenu-identifier-name-function (node)
  "A function to return the name of identifier `NODE'."
  (treesit-node-text node))

(defun bitbake-ts-imenu-identifier-node-p (node)
  "A function to check whether the `NODE' is identifier."
  (string-match-p "^identifier$" (treesit-node-type node)))

(defun bitbake-ts-imenu-directive-name-function (node)
  "A function to obtain the name of directive `NODE'."
  (treesit-node-text node))

(defun bitbake-ts-imenu-directive-node-p (node)
  "A function to check whether the `NODE' is directive."
  (string-match-p "_directive$" (treesit-node-type node)))
마무리
전체 코드는 https://github.com/seokbeomKim/bitbake-ts-mode repo를 참고한다. 한국에 얼마 남지 않은 이맥스 유저들에게 도움이 되길 바라며 글을 마무리한다.